Feishu
Feishu ボットを nexu に接続するには、App ID と App Secret だけで足ります。
ステップ 1:Feishu アプリを作成
- Feishu オープンプラットフォームにアクセスし、サインインして「カスタムアプリを作成」をクリックします。
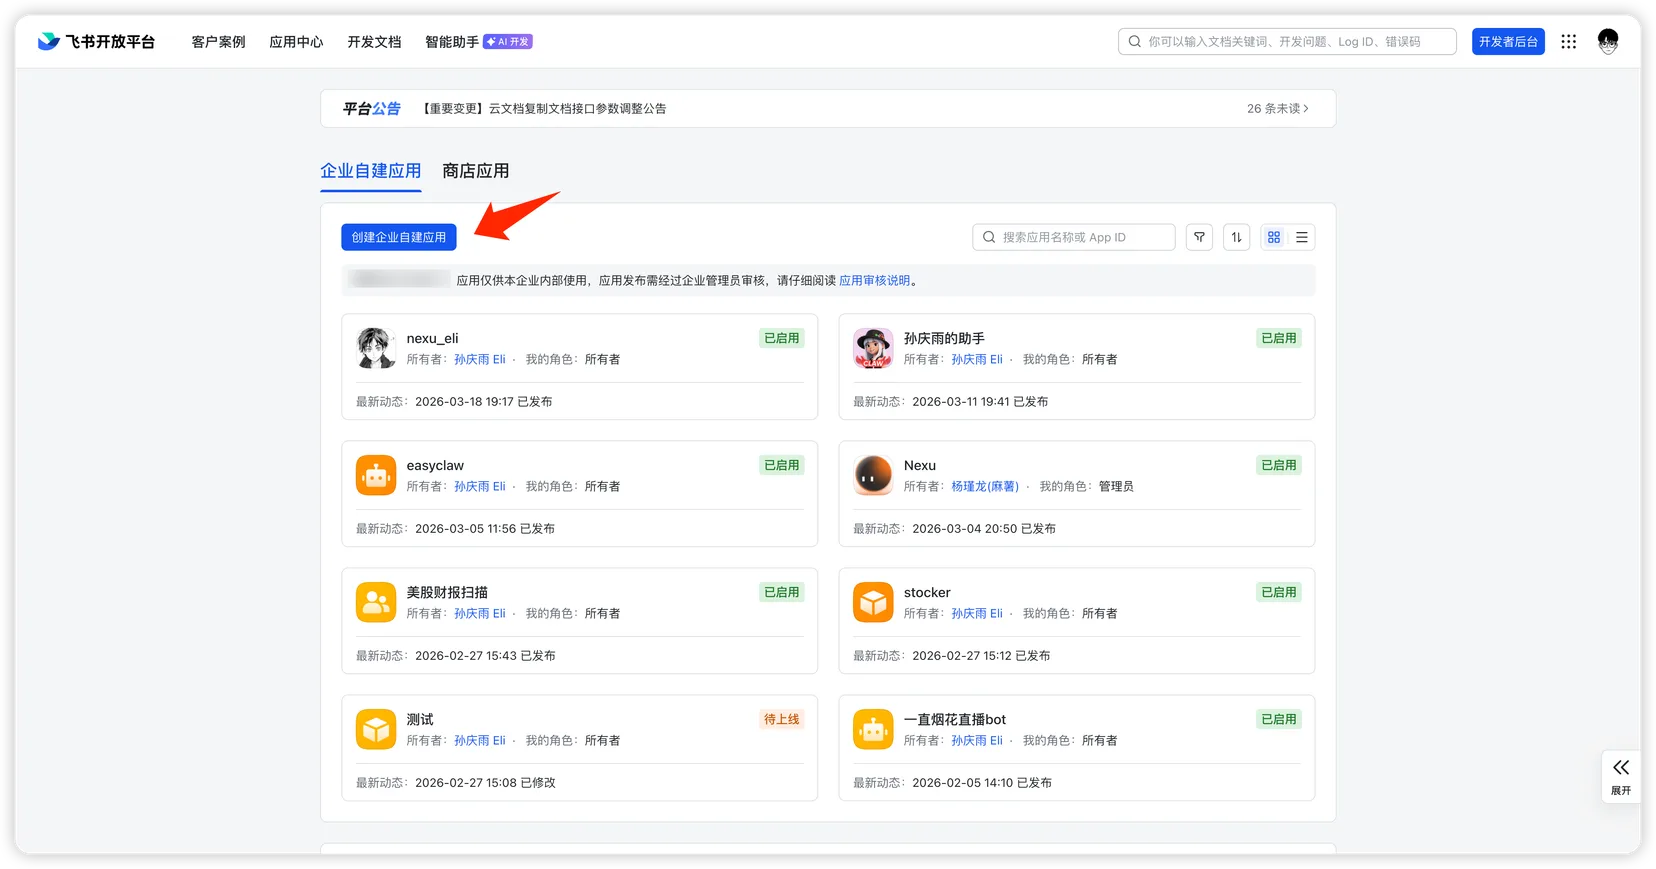
- アプリ名・説明を入力し、アイコンを選んで「作成」をクリックします。

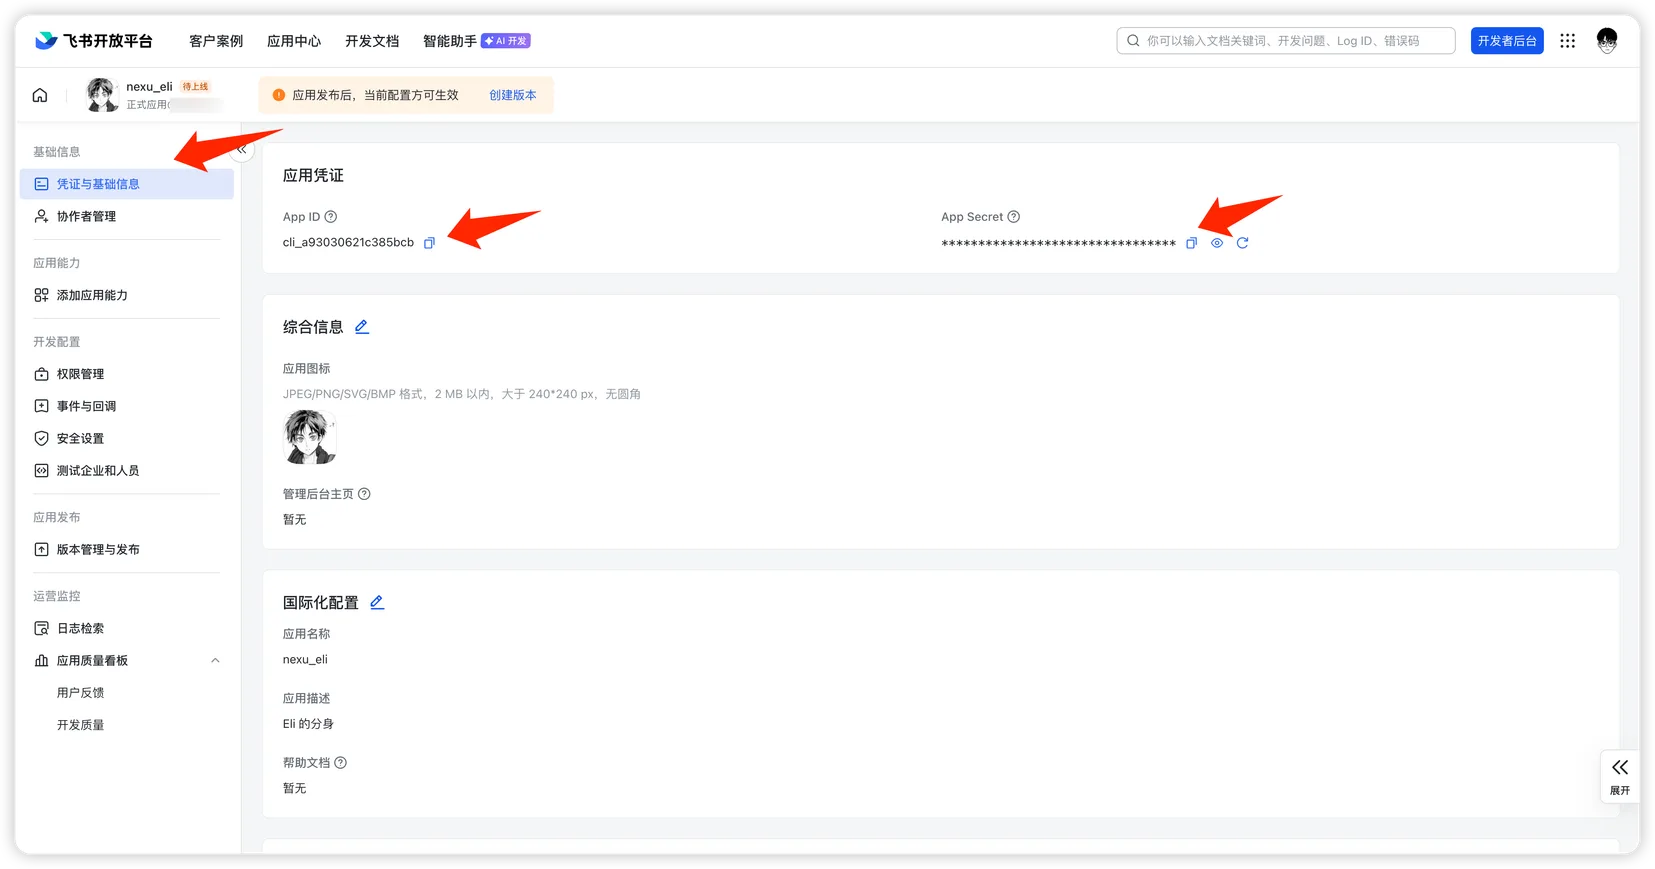
- 「認証情報と基本情報」ページで、次の2つの値をコピーします。
- App ID
- App Secret
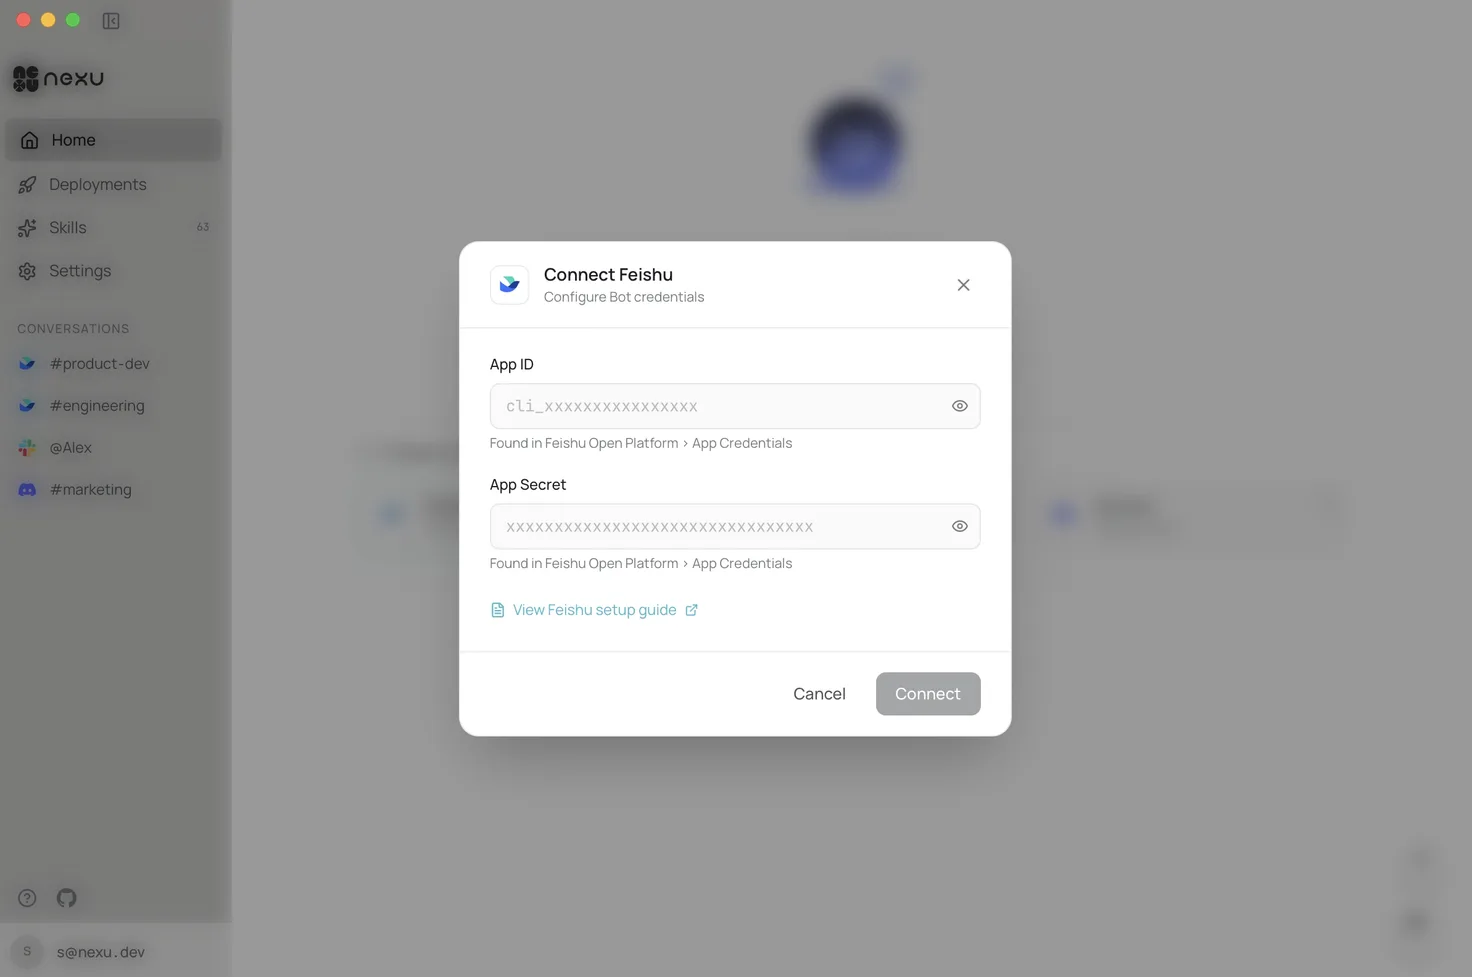
ステップ 2:nexu に認証情報を追加
nexu クライアントを開き、Feishu チャンネル設定に App ID と App Secret を入力し、「接続」をクリックします。
ステップ 3:アプリ権限をインポート
- Feishu オープンプラットフォームで対象アプリを開き、左サイドバーの「権限管理」をクリックし、「一括インポート/エクスポート」をクリックします。
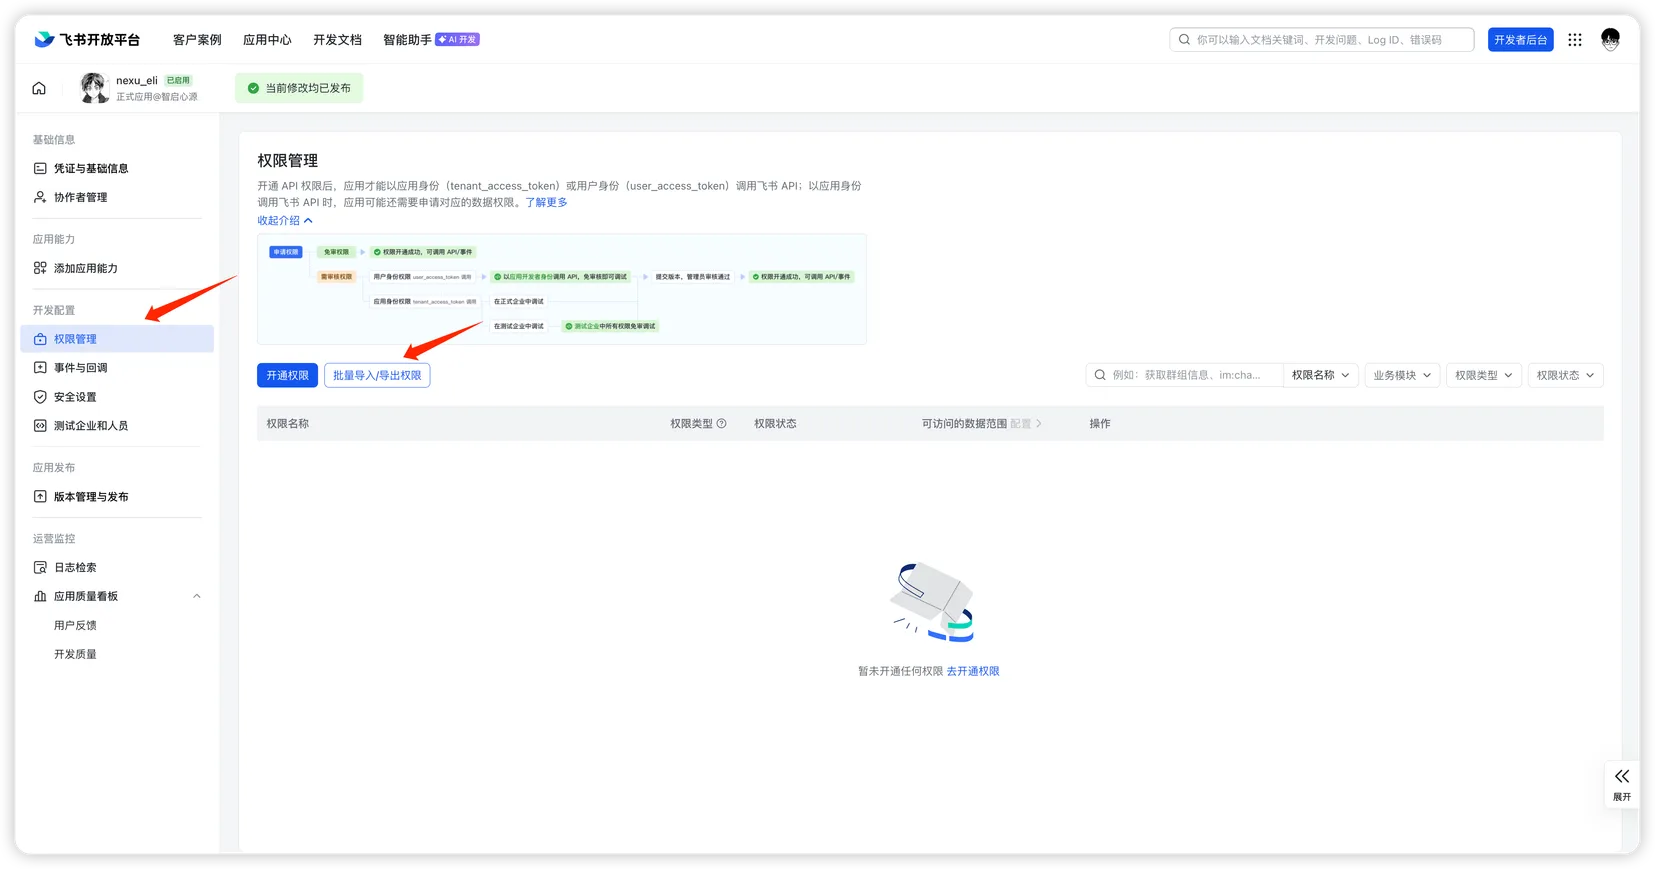
- ダイアログで「インポート」を選び、次の JSON を貼り付け、「次へ、新しい権限を確認」をクリックします。
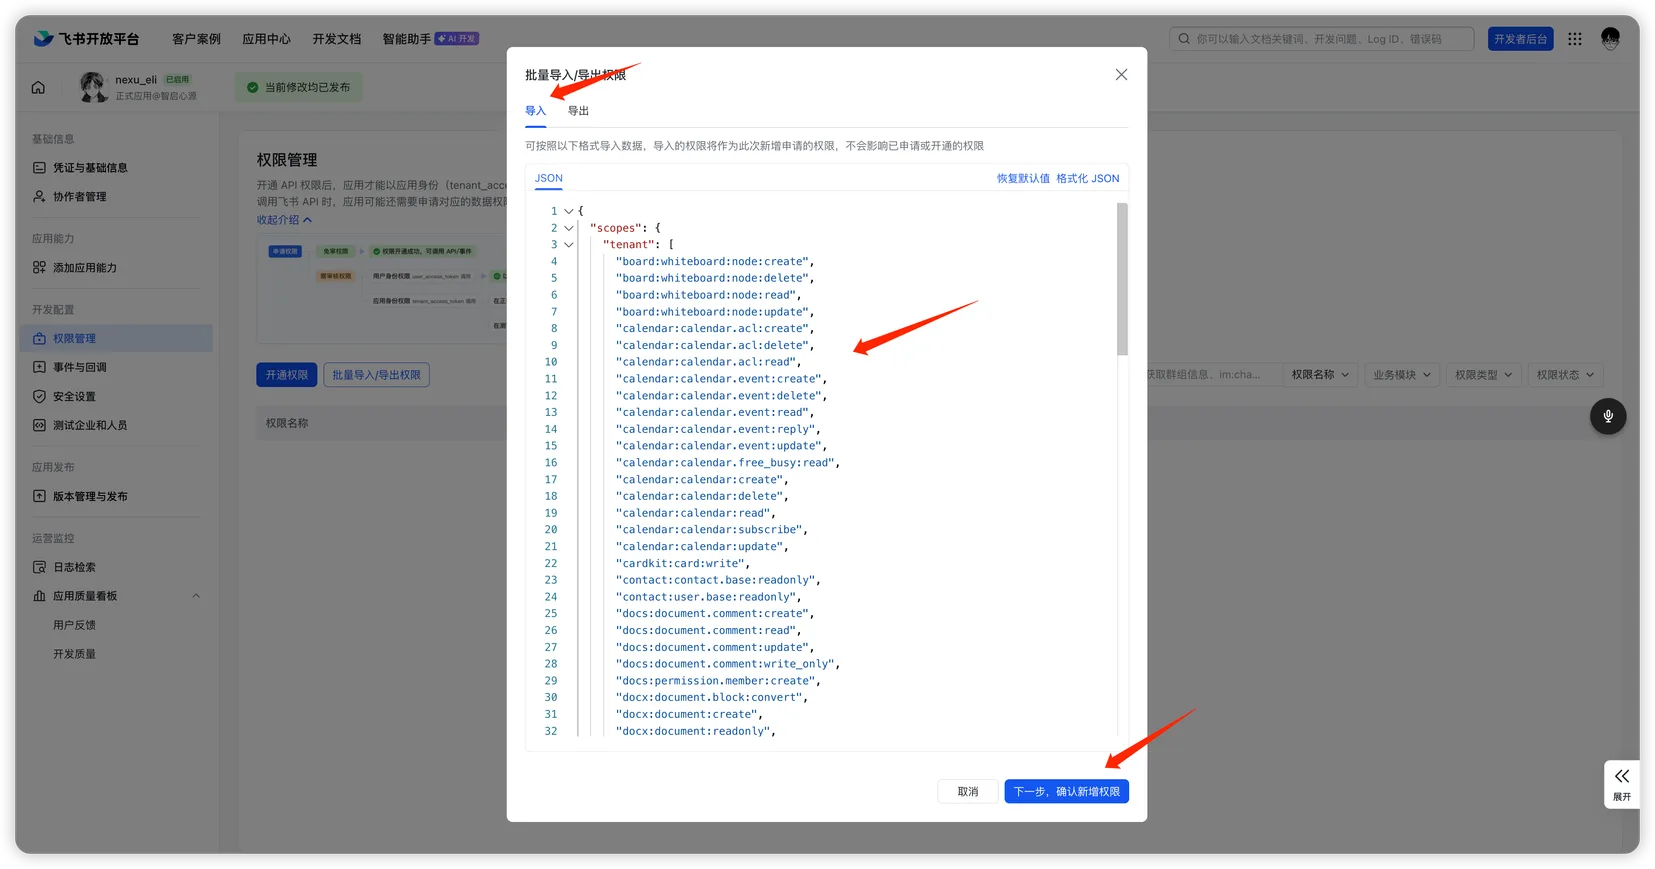
クリックして権限 JSON を展開
json
{
  "scopes": {
    "tenant": [
      "board:whiteboard:node:create",
      "board:whiteboard:node:delete",
      "board:whiteboard:node:read",
      "board:whiteboard:node:update",
      "calendar:calendar.acl:create",
      "calendar:calendar.acl:delete",
      "calendar:calendar.acl:read",
      "calendar:calendar.event:create",
      "calendar:calendar.event:delete",
      "calendar:calendar.event:read",
      "calendar:calendar.event:reply",
      "calendar:calendar.event:update",
      "calendar:calendar.free_busy:read",
      "calendar:calendar:create",
      "calendar:calendar:delete",
      "calendar:calendar:read",
      "calendar:calendar:subscribe",
      "calendar:calendar:update",
      "cardkit:card:write",
      "contact:contact.base:readonly",
      "contact:user.base:readonly",
      "docs:document.comment:create",
      "docs:document.comment:read",
      "docs:document.comment:update",
      "docs:document.comment:write_only",
      "docs:permission.member:create",
      "docx:document.block:convert",
      "docx:document:create",
      "docx:document:readonly",
      "docx:document:write_only",
      "drive:drive.metadata:readonly",
      "drive:drive.search:readonly",
      "drive:drive:version",
      "drive:drive:version:readonly",
      "im:app_feed_card:write",
      "im:biz_entity_tag_relation:read",
      "im:biz_entity_tag_relation:write",
      "im:chat",
      "im:chat.access_event.bot_p2p_chat:read",
      "im:chat.announcement:read",
      "im:chat.announcement:write_only",
      "im:chat.chat_pins:read",
      "im:chat.chat_pins:write_only",
      "im:chat.collab_plugins:read",
      "im:chat.collab_plugins:write_only",
      "im:chat.managers:write_only",
      "im:chat.members:bot_access",
      "im:chat.members:read",
      "im:chat.members:write_only",
      "im:chat.menu_tree:read",
      "im:chat.menu_tree:write_only",
      "im:chat.moderation:read",
      "im:chat.tabs:read",
      "im:chat.tabs:write_only",
      "im:chat.top_notice:write_only",
      "im:chat.widgets:read",
      "im:chat.widgets:write_only",
      "im:chat:create",
      "im:chat:delete",
      "im:chat:moderation:write_only",
      "im:chat:operate_as_owner",
      "im:chat:read",
      "im:chat:readonly",
      "im:chat:update",
      "im:datasync.feed_card.time_sensitive:write",
      "im:message",
      "im:message.group_at_msg:readonly",
      "im:message.group_msg",
      "im:message.p2p_msg:readonly",
      "im:message.pins:read",
      "im:message.pins:write_only",
      "im:message.reactions:read",
      "im:message.reactions:write_only",
      "im:message.urgent",
      "im:message.urgent.status:write",
      "im:message.urgent:phone",
      "im:message.urgent:sms",
      "im:message:readonly",
      "im:message:recall",
      "im:message:send_as_bot",
      "im:message:send_multi_depts",
      "im:message:send_multi_users",
      "im:message:send_sys_msg",
      "im:message:update",
      "im:resource",
      "im:tag:read",
      "im:tag:write",
      "im:url_preview.update",
      "im:user_agent:read",
      "sheets:spreadsheet.meta:read",
      "sheets:spreadsheet.meta:write_only",
      "sheets:spreadsheet:create",
      "sheets:spreadsheet:read",
      "sheets:spreadsheet:write_only",
      "task:task:read",
      "task:task:write",
      "task:tasklist:read",
      "task:tasklist:write",
      "wiki:member:create",
      "wiki:member:retrieve",
      "wiki:member:update",
      "wiki:wiki:readonly"
    ],
    "user": [
      "contact:contact.base:readonly"
    ]
  }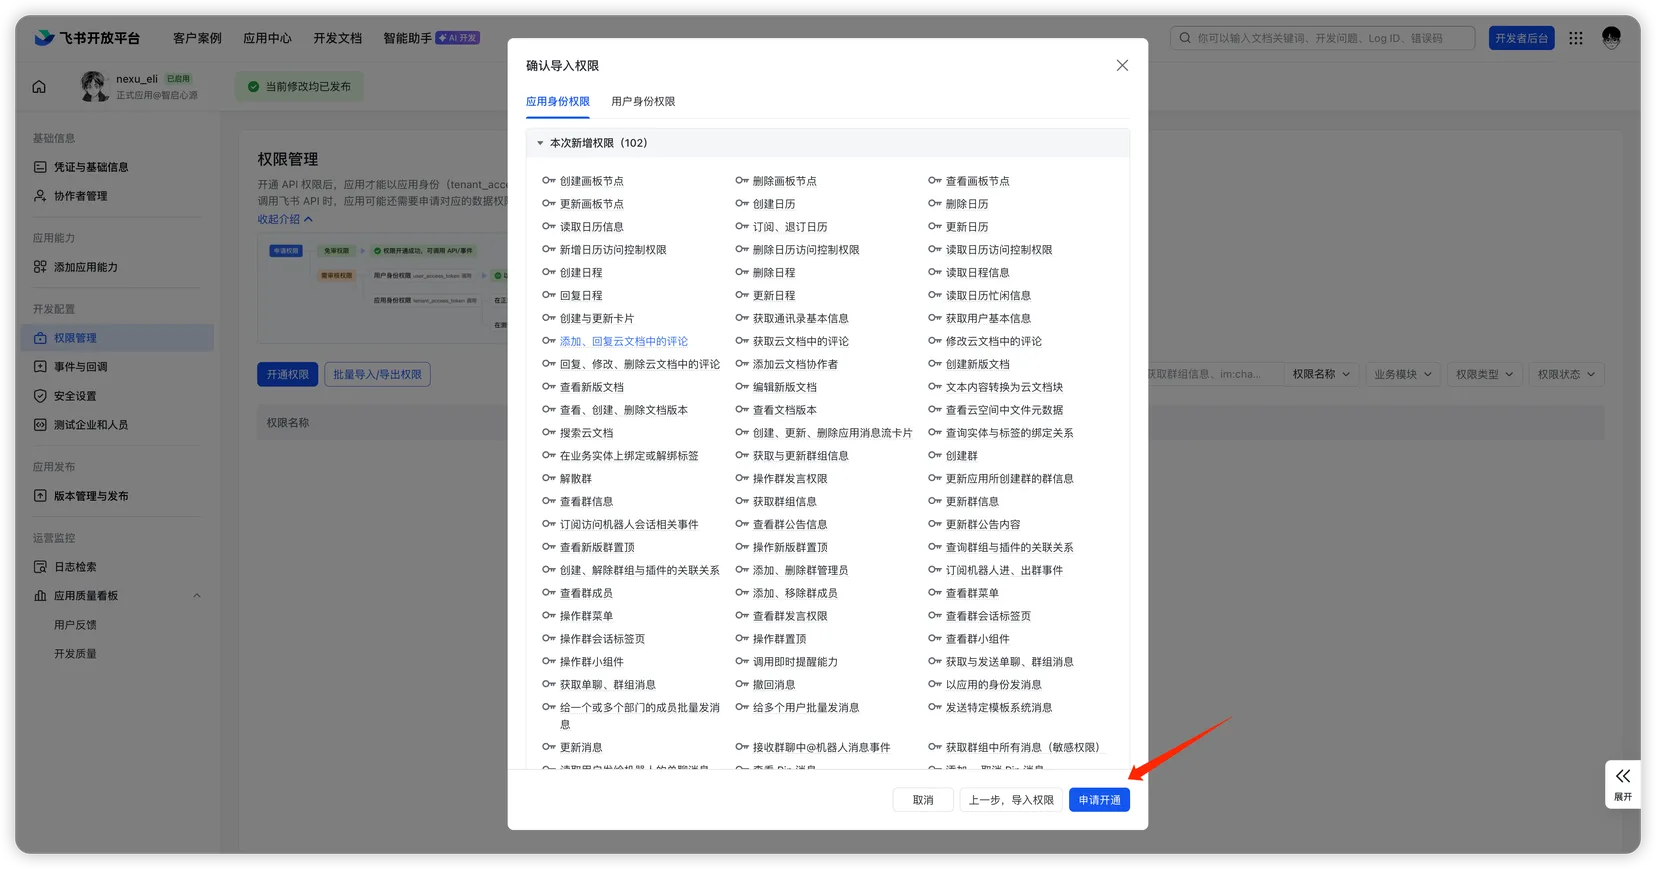
}- インポートされた権限(合計 102 件)を確認し、「適用」をクリックします。
- データ範囲の確認ダイアログで「確認」をクリックし、インポートを完了します。
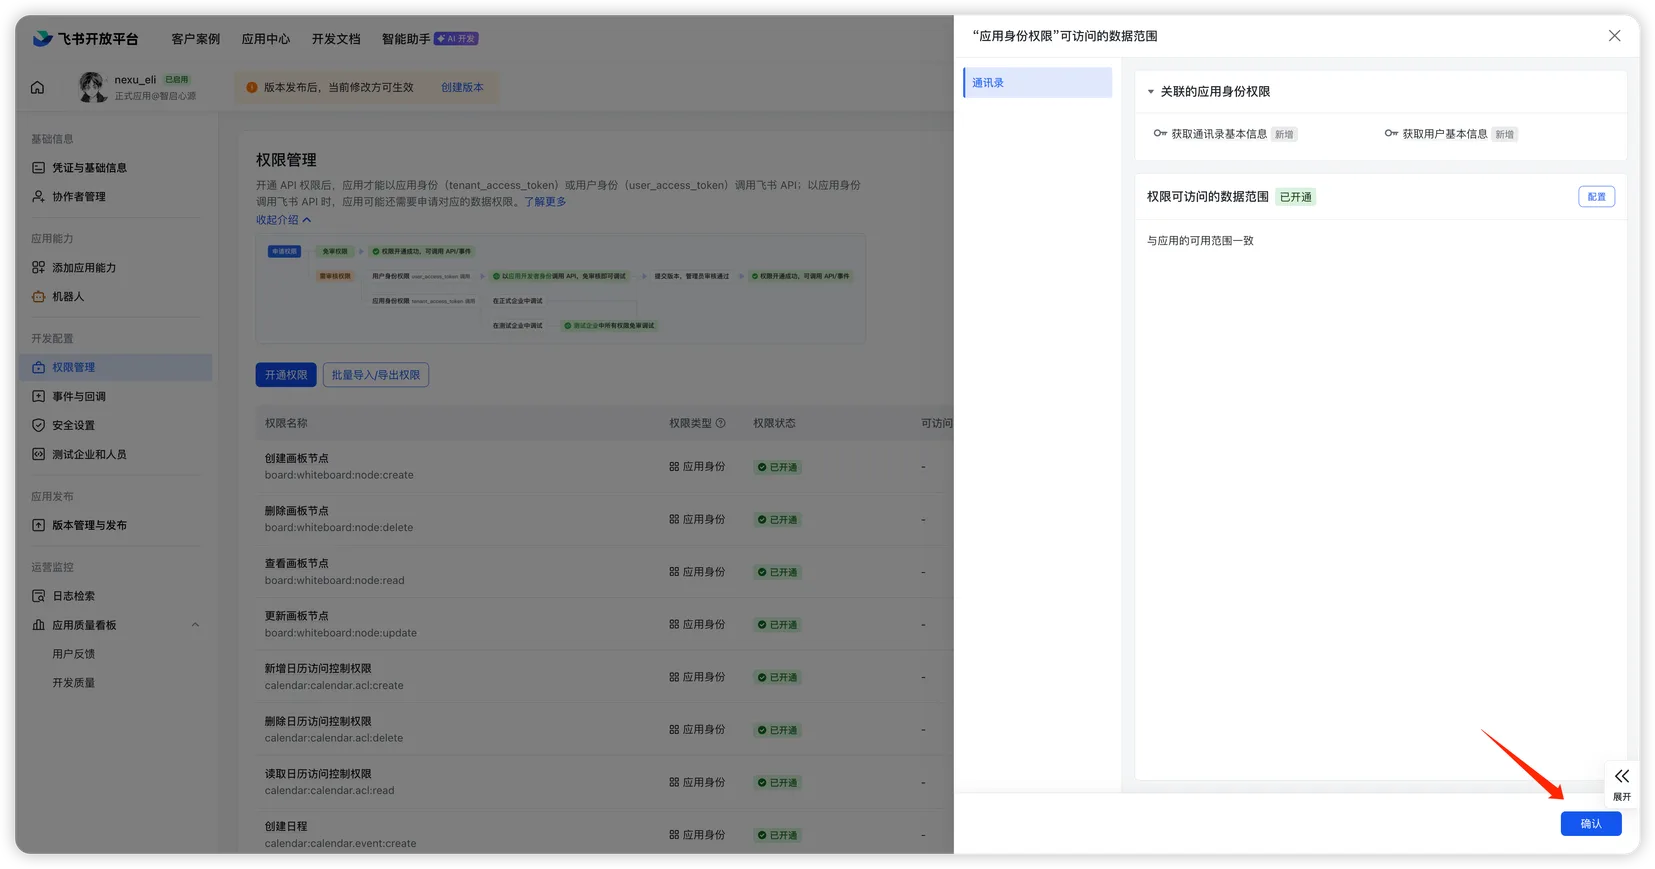
これらの権限はメッセージ、ドキュメントの読み書き、カレンダー管理、スプレッドシート操作などをカバーし、nexu エージェントの各種スキルが正しく動作するようにします。
ステップ 4:イベントとコールバックを設定
イベント設定
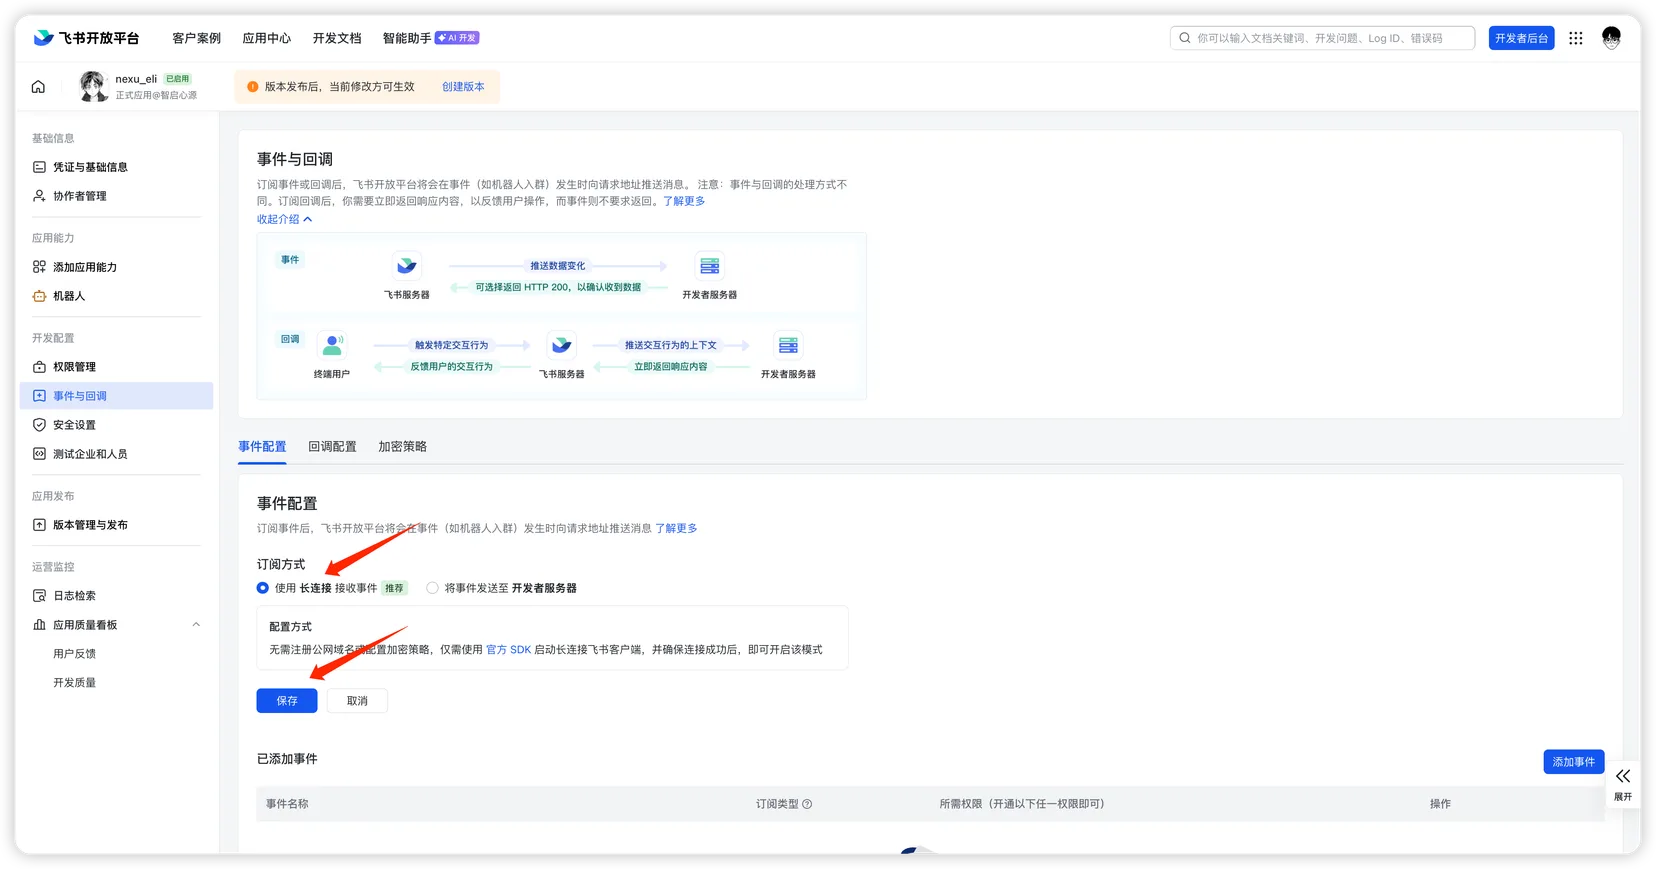
- Feishu オープンプラットフォームで対象アプリを開き、左サイドバーの「イベントとコールバック」をクリックし、「イベント設定」タブを開きます。
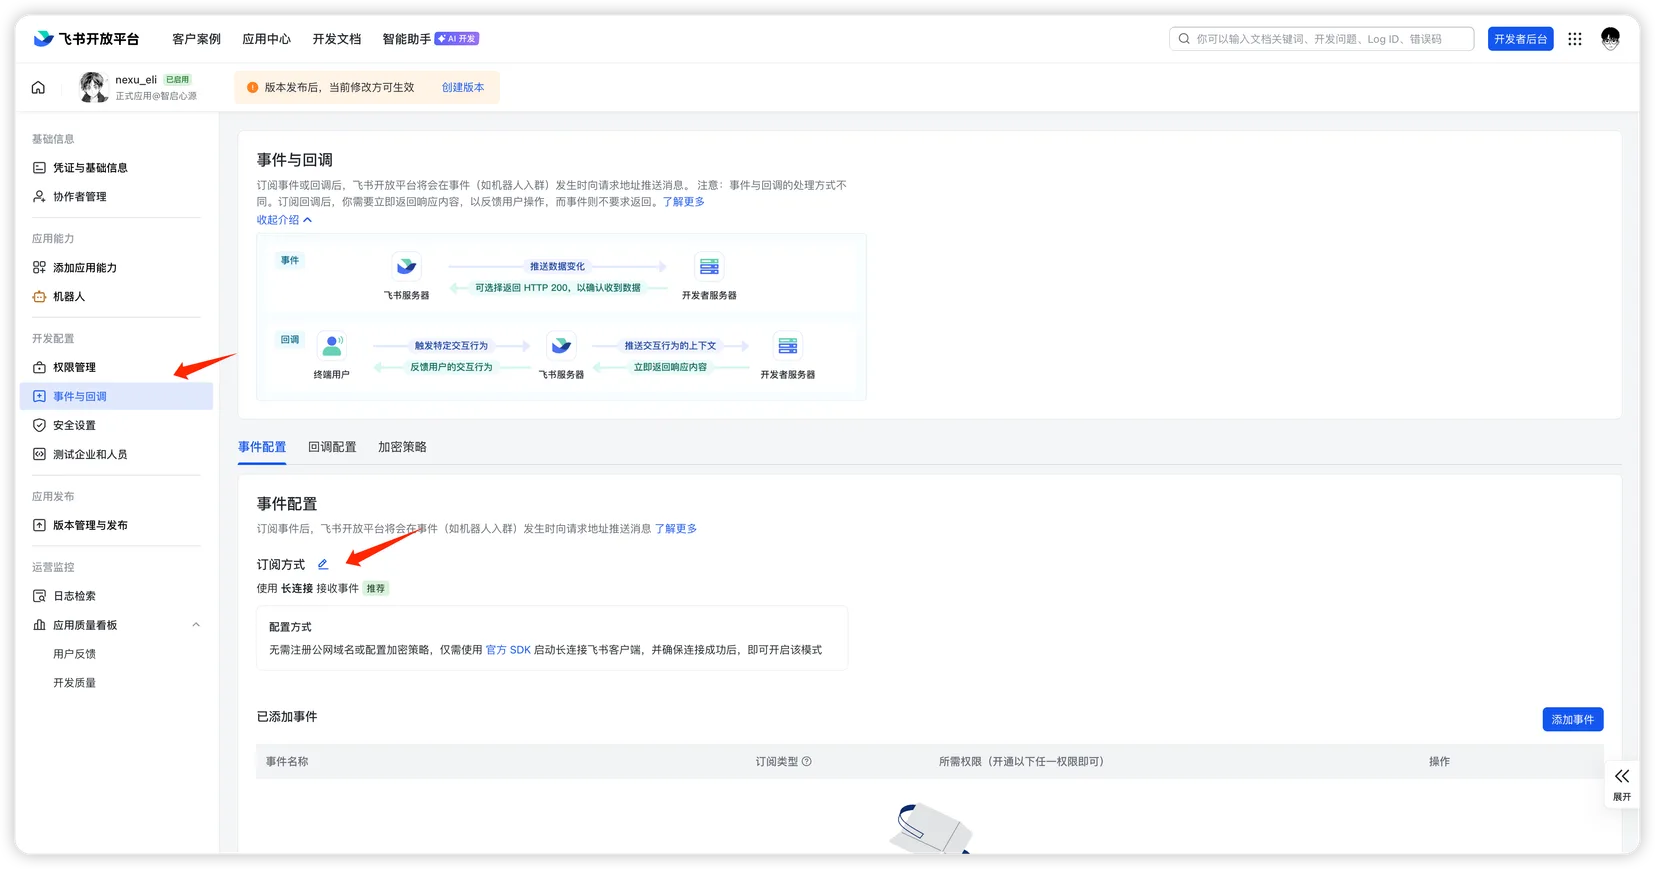
- 「購読方式」の横の編集ボタンをクリックし、「ロングコネクションでイベントを受信」を選んで「保存」をクリックします。
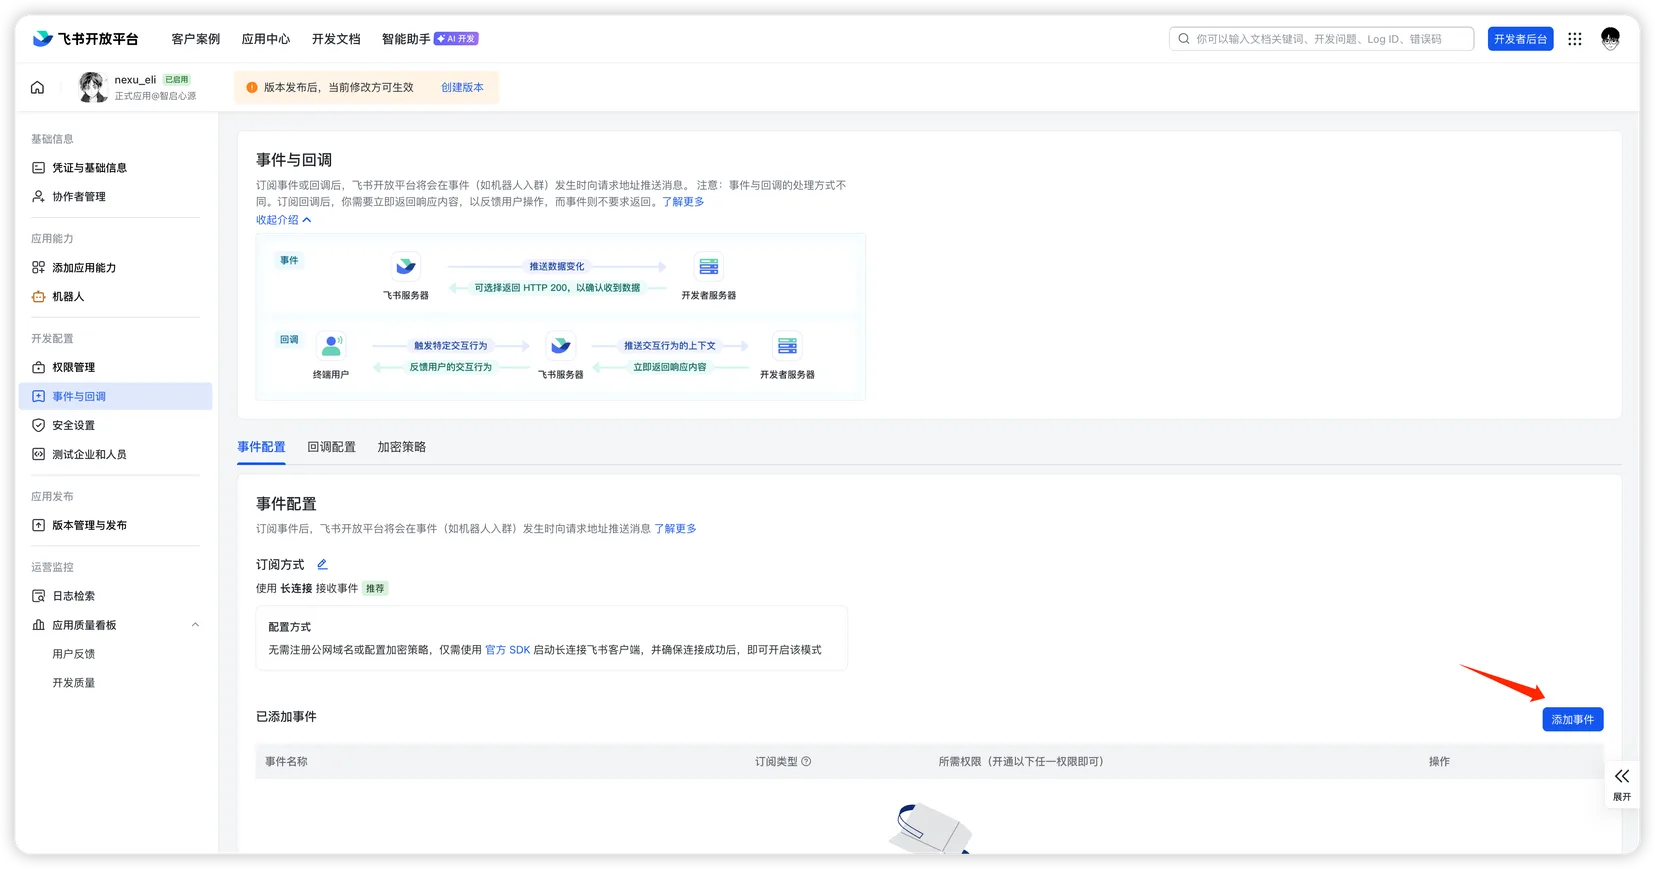
- 「イベントを追加」をクリックします。
- ダイアログで次のイベントを検索して選択し、「追加」をクリックします。
- ユーザーとボットの初回会話が作成された(
p2p_chat_create) - メッセージを受信(
im.message.receive_v1) - ボットがグループに追加された(
im.chat.member.bot.added_v1) - ユーザーがボットとの会話に入った(
im.chat.access_event.bot_p2p_chat_entered_v1)
- ユーザーとボットの初回会話が作成された(
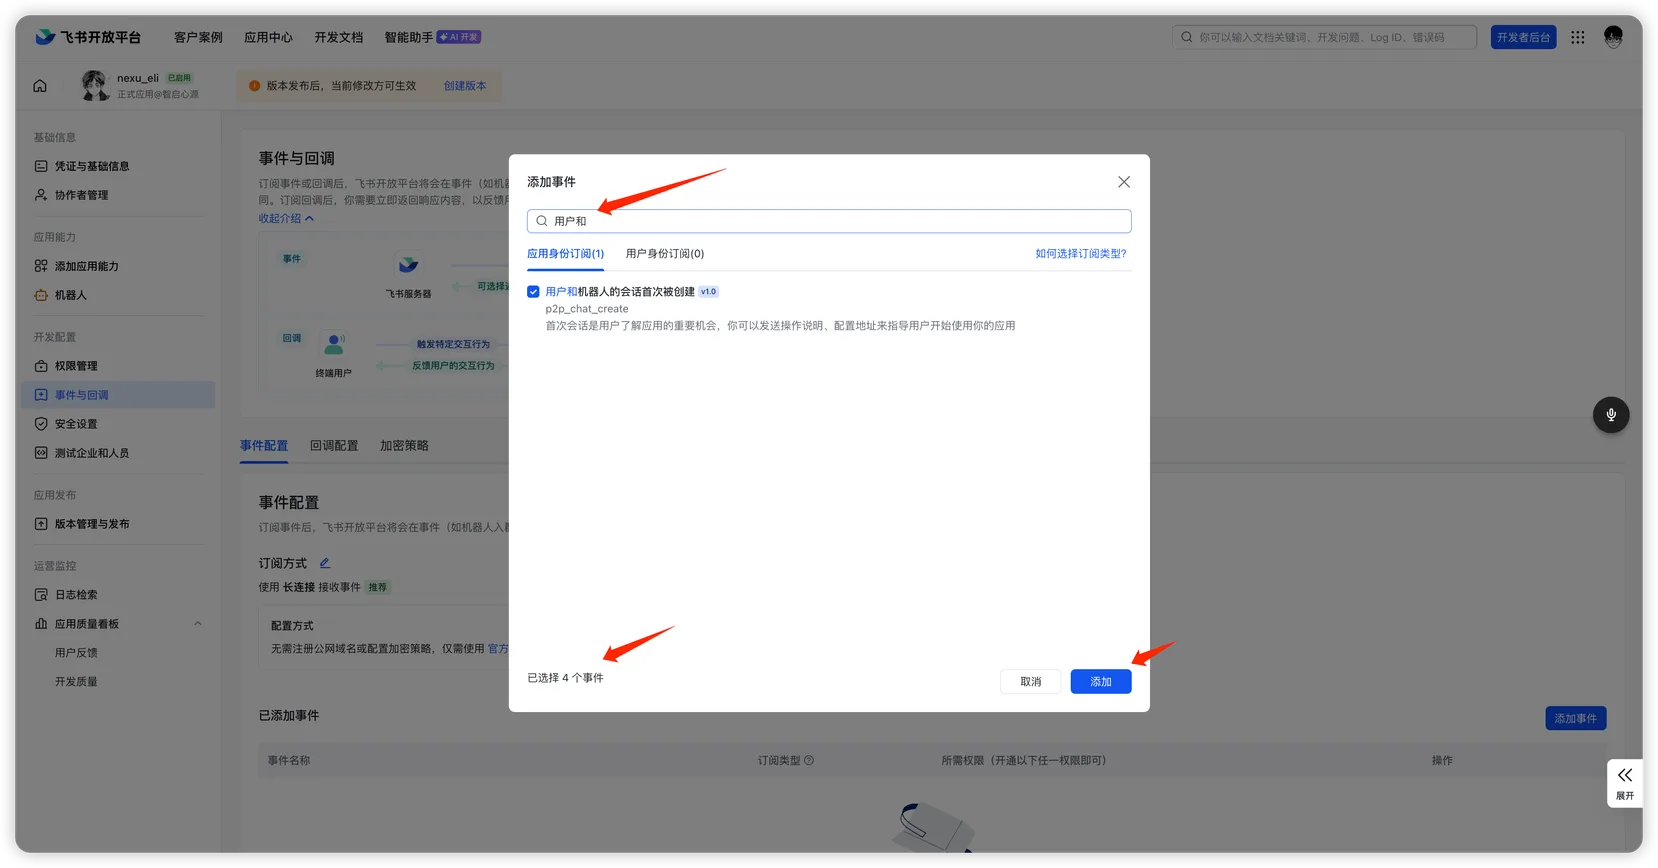
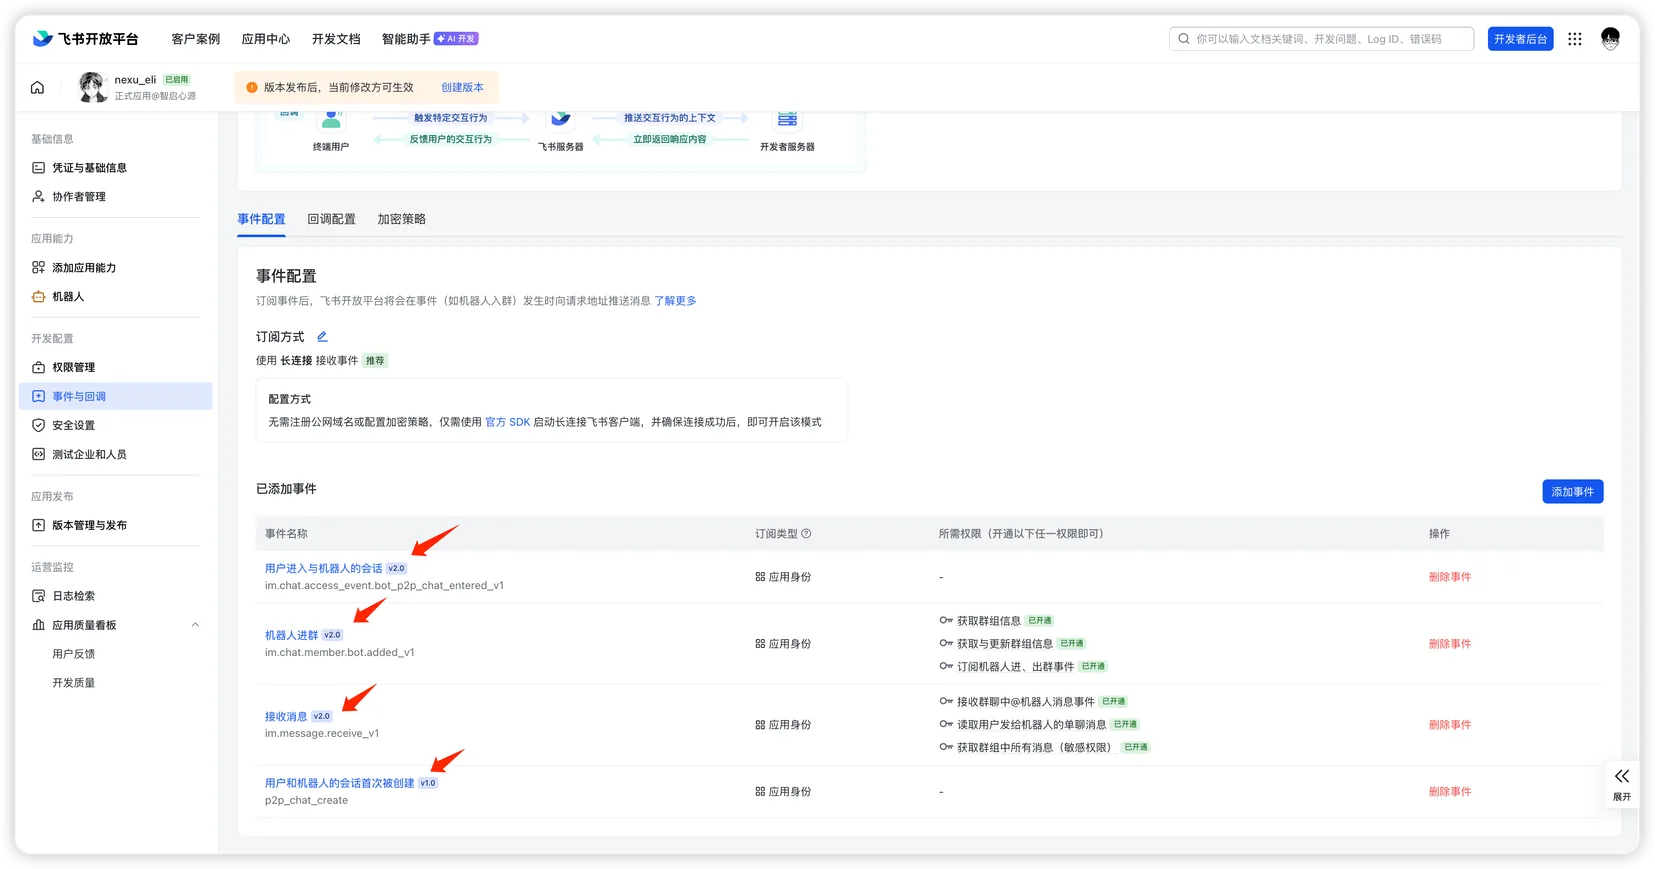
- 追加後、「追加済みイベント」一覧で内容を確認します。
コールバック設定
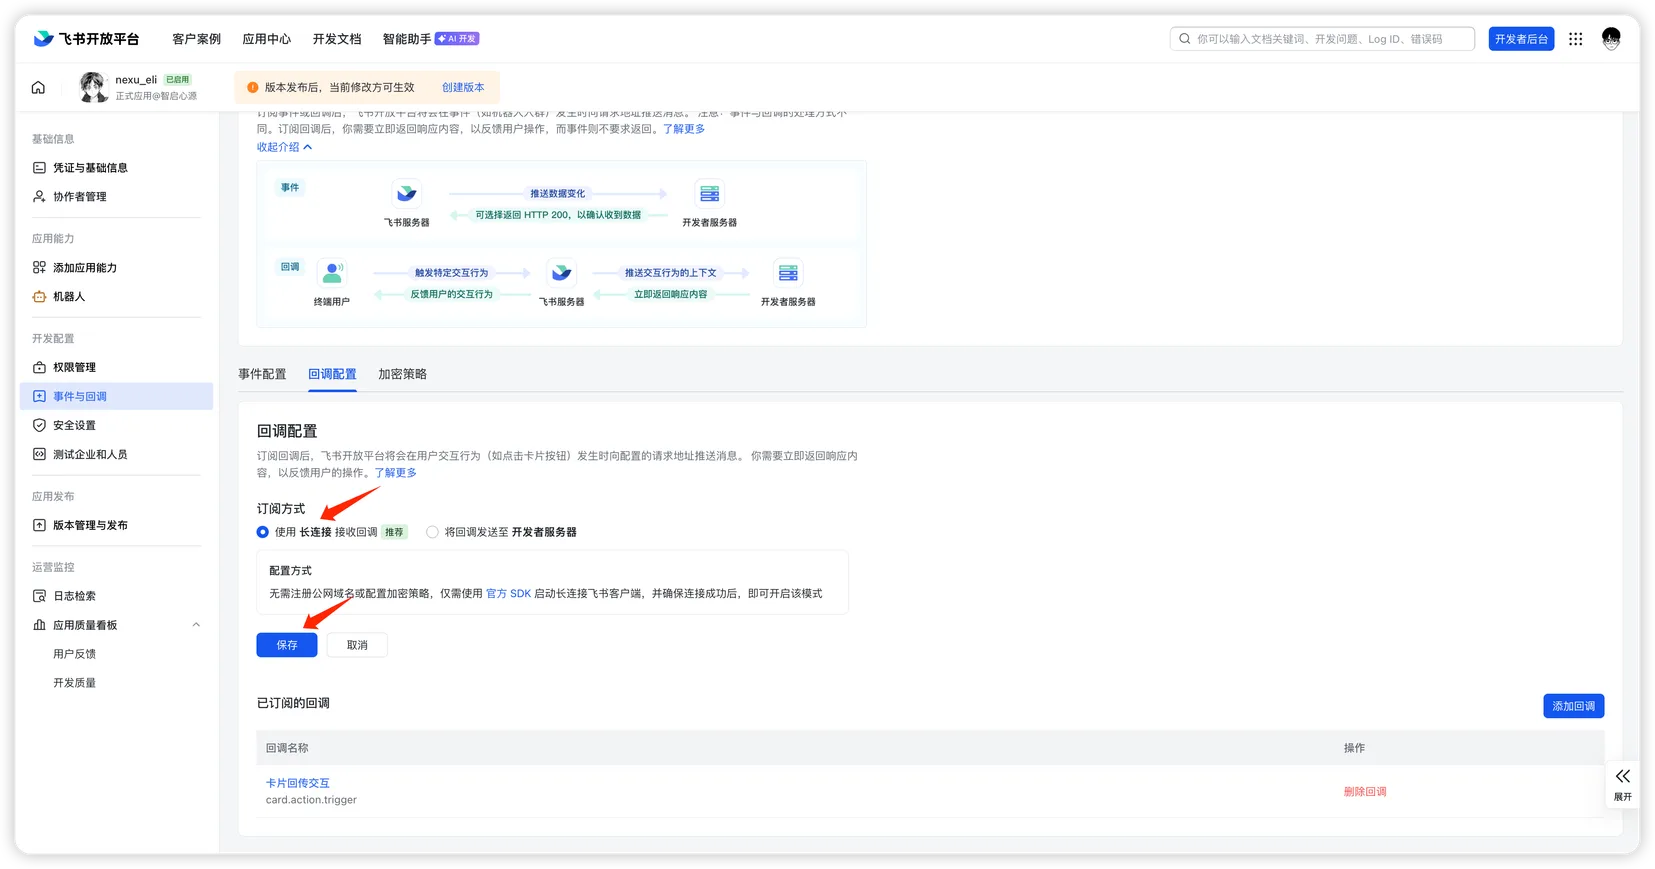
- 「コールバック設定」タブに切り替え、「購読方式」の横の編集ボタンをクリックします。
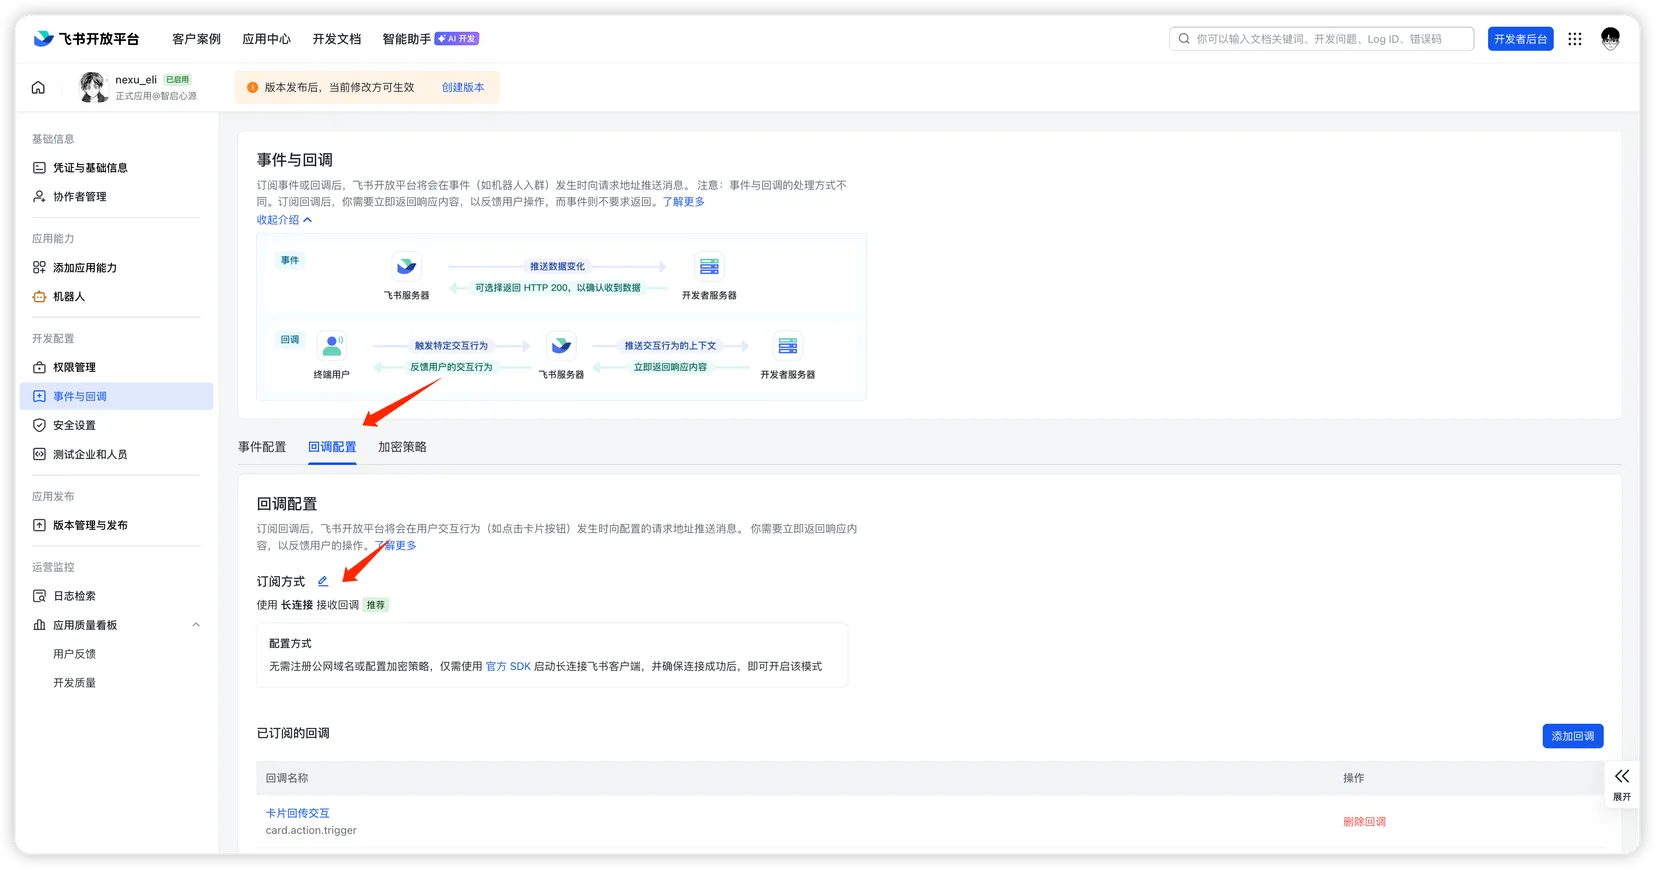
- 「ロングコネクションでコールバックを受信」を選び、「保存」をクリックします。
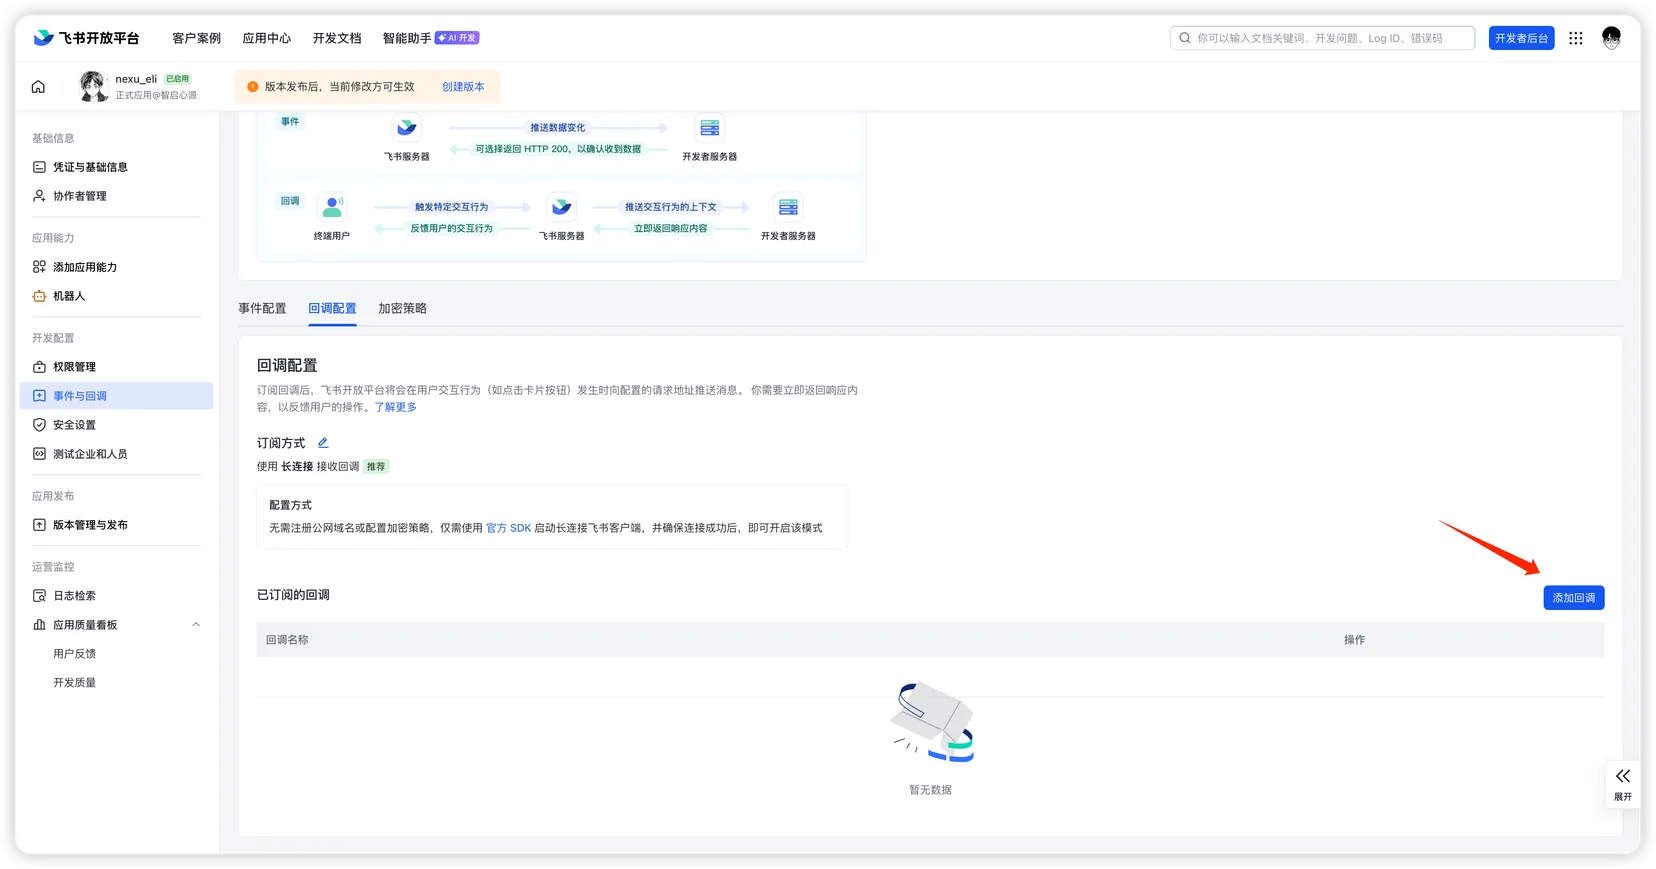
- 「コールバックを追加」をクリックします。
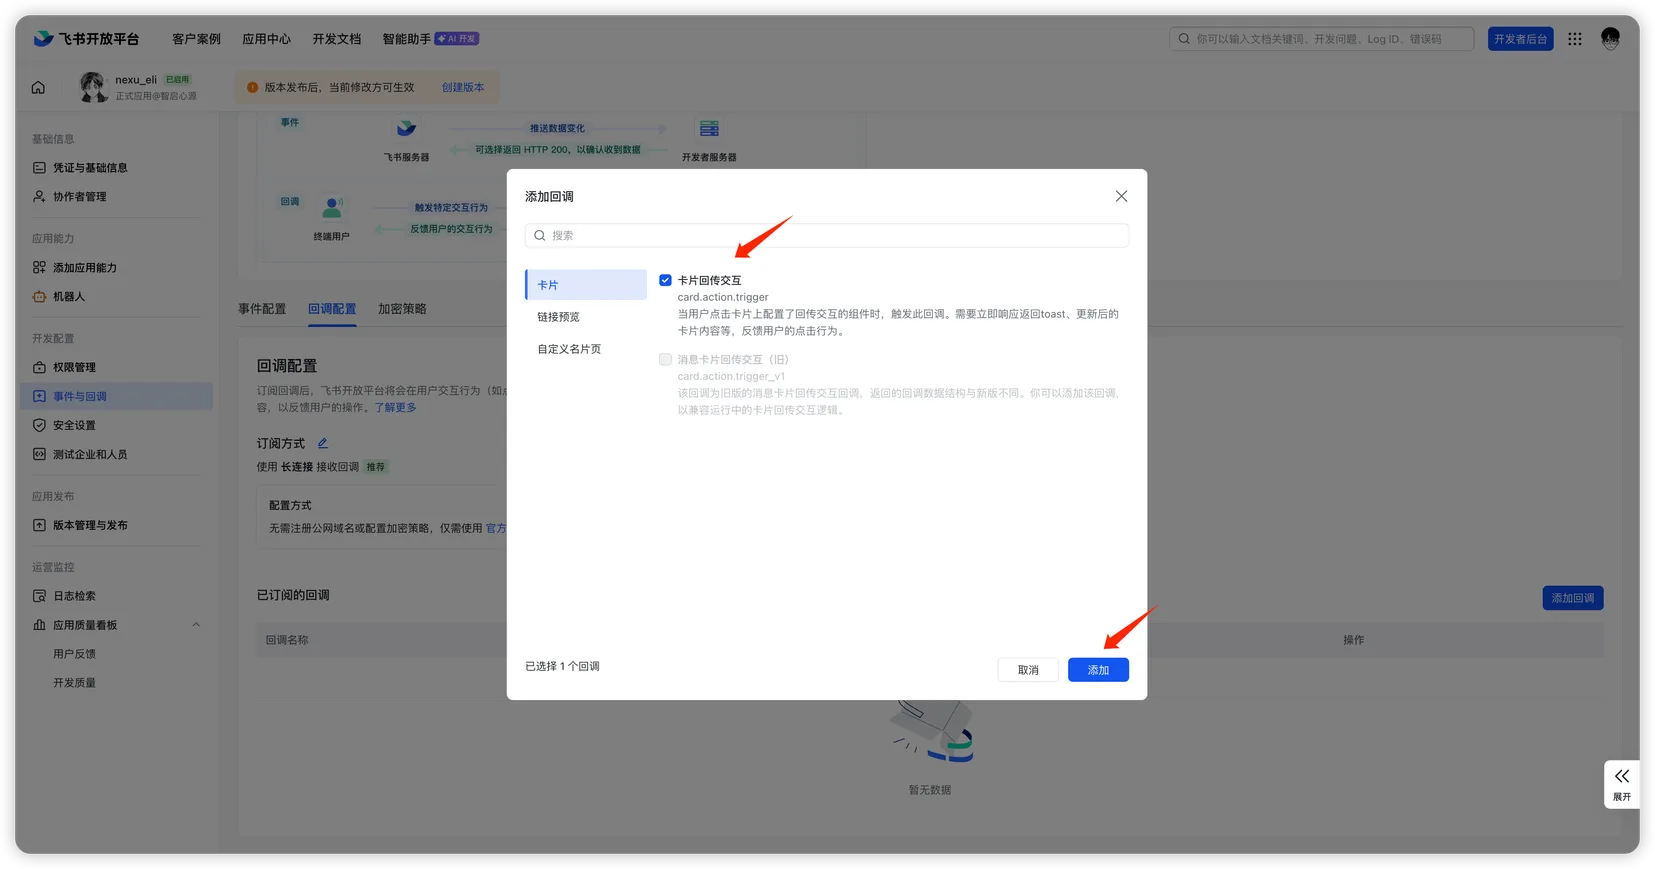
- ダイアログでカテゴリ「カード」を選び、「カードアクションのトリガー」(
card.action.trigger)にチェックを入れ、「追加」をクリックします。
ステップ 5:公開とテスト
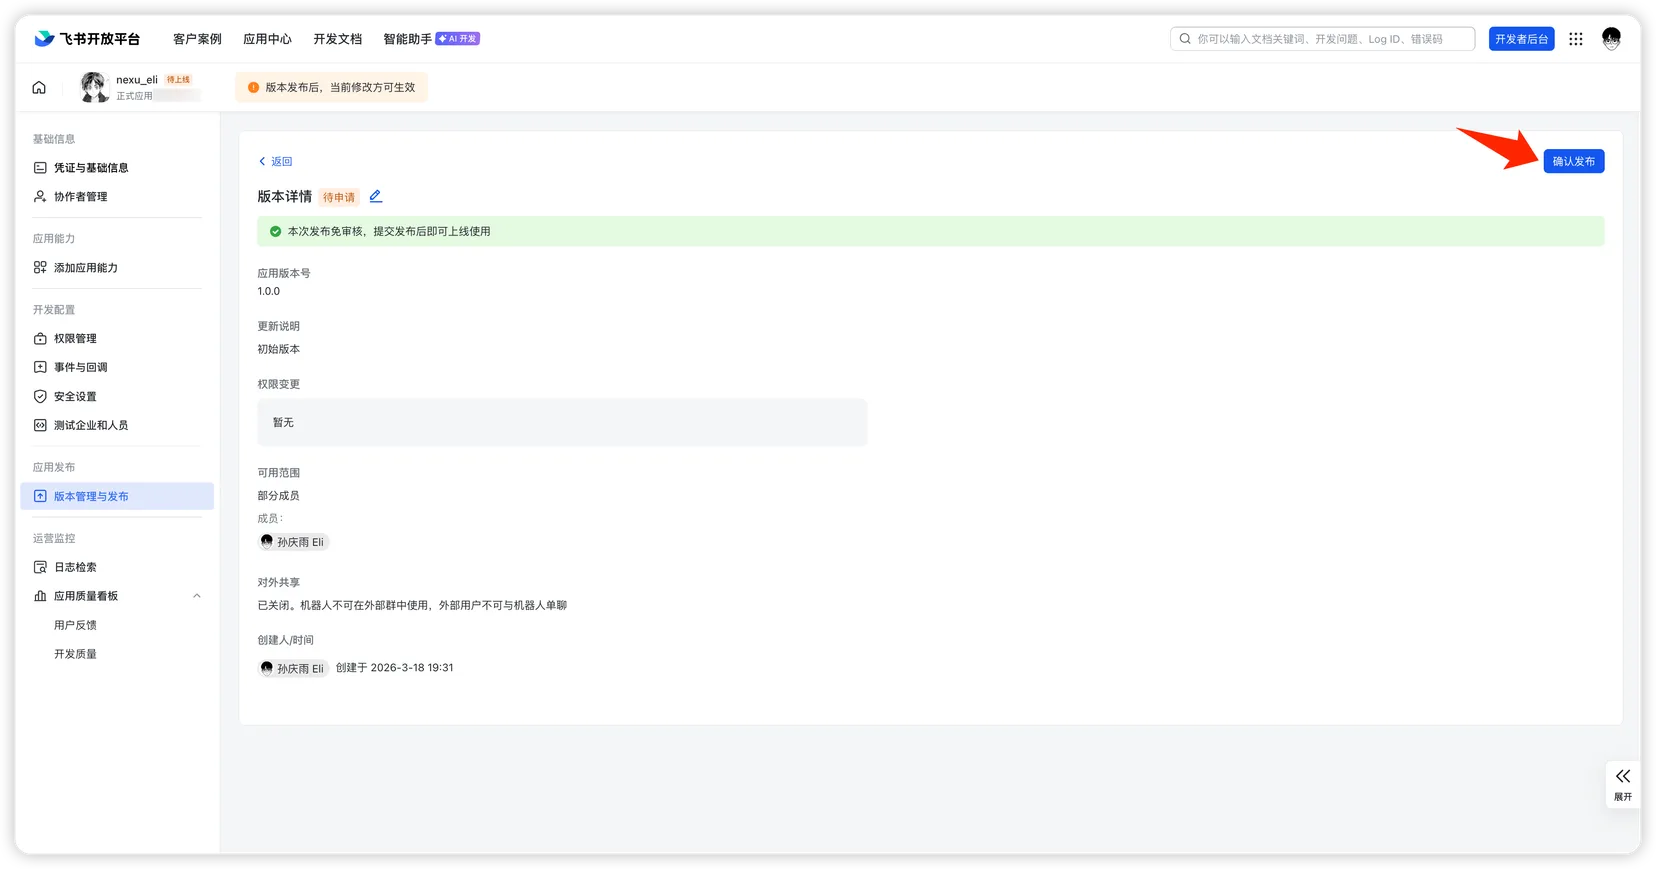
- Feishu オープンプラットフォームに戻り、「バージョン管理とリリース」に移動します。

- 「バージョンを作成」をクリックし、バージョン番号とリリースノートを入力して「保存」をクリックします。

- 「公開」をクリックし、承認を待ちます。
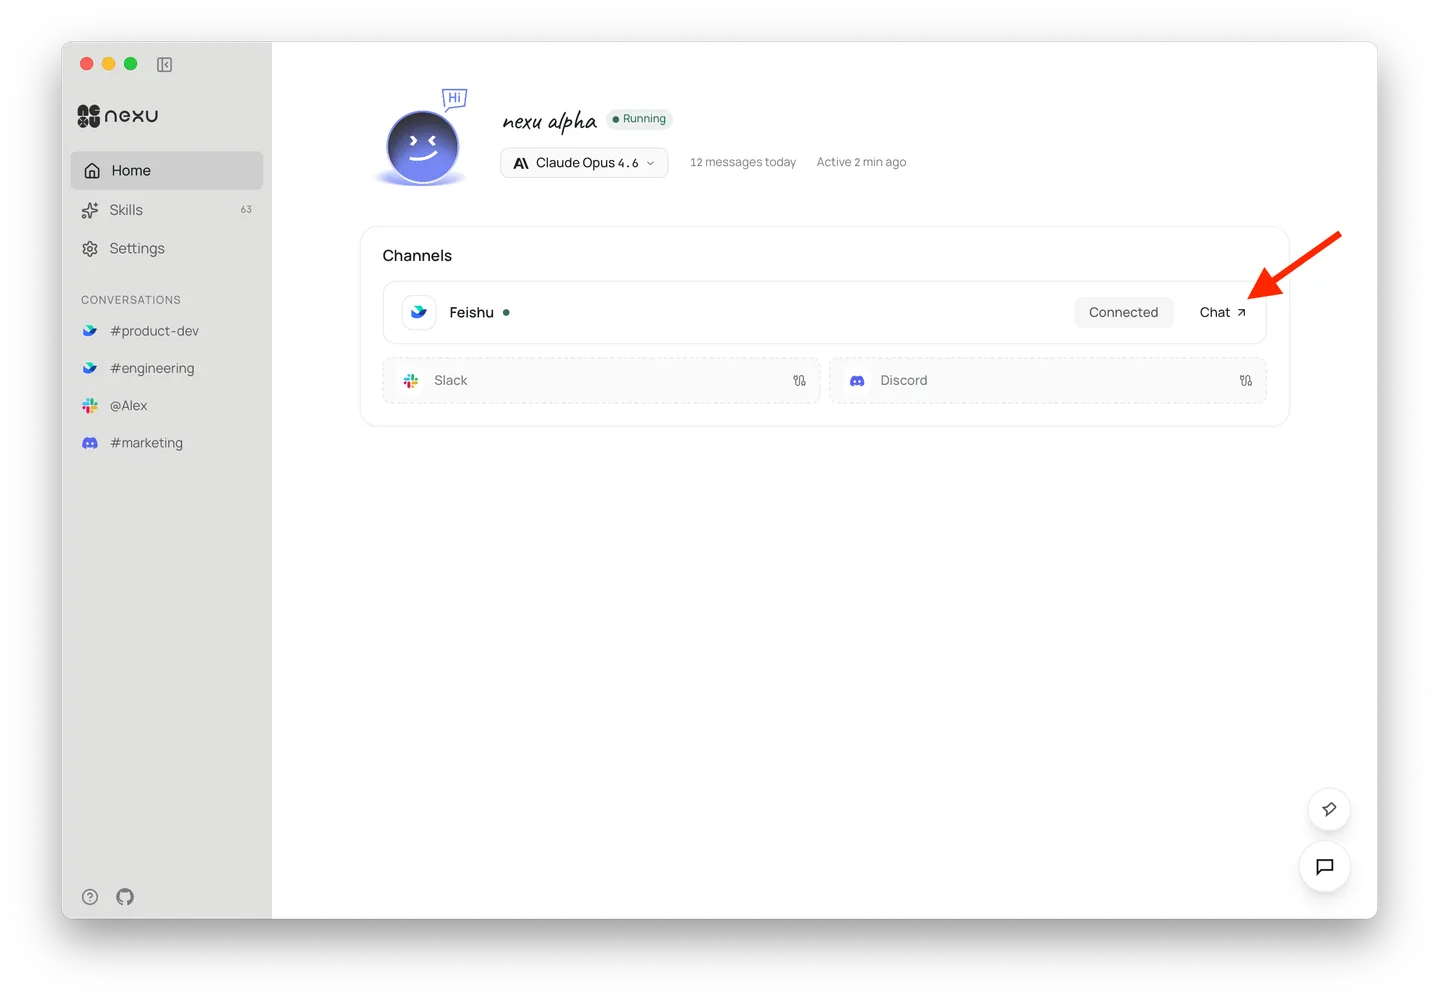
- 承認後、nexu クライアントで「チャット」をクリックし、Feishu に移動してボットと会話を始めます 🎉
FAQ
Q: パブリックサーバーは必要ですか?
いいえ。nexu は Feishu のロングコネクション(WebSocket)モードを使用するため、パブリック IP やコールバック URL は不要です。
Q: なぜこれほど多くの権限が必要なのですか?
これらの権限は nexu エージェントの各種スキル(メッセージング、ドキュメント、カレンダー、スプレッドシートなど)に対応しています。基本的なチャットのみ必要な場合は、im: スコープのみ有効にできます。